
In my last article I talked about cutting the notch. The next step is to make the back-cut. The back-cut is very important because it is what forms the hinge. The hinge is the uncut wood left behind the apex of the notch, and is formed as the back-cut is completed. The hinge is what provides control and guides the tree as it falls. If the hinge is too thick the tree won’t fall, and if it is too thin control of the falling tree can be lost. Cutting a more open notch will allow the hinge to work longer, which is safest as the hinge can provide control until the tree is on the ground.
The back-cut is started from the backside of the tree to where the notch was made, and often it is raised to provide a step or shelf for the falling tree to push against in the event the hinge fails, reducing the chance of the tree sliding back off of the stump. It is not necessary to raise the back-cut if the notch opening is large enough to allow the hinge to remain intact; however it is sensible in certain instances.
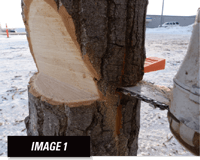
The back-cut should be level and cut perpendicular to the grain of the wood. This allows the hinge to work best and also allows a wedge to be used to overcome minor back lean challenges.

It is a good habit to place a wedge in the back-cut whenever falling a tree, therefore, it is wise to always have a wedge or two available whenever falling trees, and in some provinces it is legislated to have wedges on-hand when tree falling. Falling wedges have barbs or ‘dogs’ on one side and these ‘dogs‘ are placed downward onto the stump when used. In the event the tree does not begin to fall once the back-cut is completed the wedge can be pounded into the back-cut with an axe or large hammer.
Falling wedges are placed into the kerf as soon as there is enough room behind your chain saw bar for the wedge to be set. The wedge must not contact the saw chain or else the moving chain will spit it out. The trick is to cut far enough to place the wedge, but not so far that the hinge is so thin that the tree is ready to fall.

A handy technique to ensure your back-cut is level is to scribe a line with your chain saw from one side of the notch around the trunk of the tree to the other side of the notch. This scribed line can then be used as a guide when cutting the back-cut.
Another handy technique is to scribe a vertical line behind the notch where you want to stop the back-cut and leave the hinge wood. A rule of thumb for hinge thickness is 10% of the trunks diameter. Remember the hinge provides control and it is easy to cut too much, and a falling tree with no hinge is out of control. The techniques I am describing here are for trees up to approximately 20 inches in diameter. Trees larger in diameter than 20 inches require different techniques for the back-cut and hinge other than described here.
Once the back-cut is complete and as the tree begins to fall, always remember to quickly retreat down your escape route. The escape route should be at an angle back and away from the falling tree; this gives you two potential escape route plans. Studies have shown that 90% of all injuries and fatalities occur within five feet of the stump within the first 15 seconds as the tree begins to fall. You decrease your chances of being injured by 90% the further and faster you get away from the tree as it falls. Safety, planning and the escape route is what I plan to discuss in my next article in this series.
A short article is no substitute for training and I recommend you enroll in a chain saw course and get some hands-on practice and coaching. Always wear your PPE, a hard hat system with a face shield and ear muffs is a good choice, in addition to chain saw chaps or pants, eye protection, work boots and gloves.
This is the second of three articles. In my next article, I plan to discuss “The Escape Route” and “The 5-15-90 Rule”
by Dwayne Neustaeter
Arboriculture Canada Training & Education Ltd. www.arborcanada.com